Pages

Thursday 31 January 2013

Install Sql Server 2008 R2 step by step


On the screen above, make a click on the "Installation" hyperlink in the left side of the screen.


This screen shows the types of installation available.  Let's select the first type available "New SQL Server stand-alone installation or add features to an existing installation".


Above you will find the first set of Setup Support Rules. The Next button is available only if all check results are successful, or if failed checks do not block installation


On the page above, specify the edition of SQL Server to install.  We chose the Enterprise Evaluation Edition.


The above is the License Terms page.  Read the license agreement and if you agree with it, check the "I accept the license terms" check box, and then click the Next button.


On the following page, setup is installing a required component.


The following is a new page on SQL Server setup, its name is Setup Role. Here you have three options:

bulletChoose "SQL Server feature installation" to install SQL Server Database Engine, Analysis Services, Integration Services, Reporting Services.
bulletChoose "Analysis Services with SharePoint Integration" if you want SQL Server setup to add PowerPivot for SharePoint to a SharePoint farm.
bulletChoose "All Features With Defaults" to install all features of SQL Server in one box.


On the Feature Selection page, select the features for your installation.


The page below belongs to the second set of Setup Support Rules.


On the Instance Configuration page, select a default or named instance for your installation, and select de directory where you want to install de features you have chosen.


This page is just for the purpose of reviewing disk usage.  Click on the "Next" button to continue setup.


It is recommended to create a local user or domain user account to start SQLServer services, the next page setup will display is all about SQL Server service accounts.

If the computer is not part of a domain, use a local user account without Windows administrator permissions. You can create this account using Control Panel -> User Accounts.

Use a Domain User Account if the service must interact with network services or access domain resources. This account should be pre-created by a domain administration in your environment.
Whether you create a local user or a domain user account, the password you use to create the account must be a strong password.

You can also use built-in accounts as the NetworkService account, but I would not recommend to use Local Service Account for SQL Server (MSSQLSERVER). Use Local System if you need a very high-privileged account. It has extensive privileges on the local system.


Microsoft recommends you to specify an individual account for each service. The service accounts used for this configuration must have a strong password as mentioned above, otherwise you will get the error "Invalid or missing username or password. To continue, provide valid credentials for the SQL Server Agent service".  A strong password  is one that has a combination of letters in uppercase, lowercase, numbers and special characters.


On the Collation tab, specify the collation for your SQL Server instance.


On the Database Engine Configuration page, choose the authentication mode to use for your SQL Server installation.

Enter and confirm the password for the (sa) login when you choose Mixed Mode Authentication.


If you are planning to use FILESTREAM with SQL Server 2008 R2, you may want to enable it on this tab or do it later.


On this page, provide user account that will be Analysis Services administrators.


If you selected Reporting Services as a feature to install, the Report Services Configuration page is displayed.   Here we chose to install Reporting Services on Native mode.


On the Error and Usage Reporting page, optionally clear each check box to disable error reporting.


The above screens belong to the Installation Configuration Rules.


On the Ready to Install page, review the summary of features and components for your SQL Server installation. To proceed, click Install.


On the Completing the Microsoft SQL Server Installation Wizard page, you can view the Setup summary log by clicking the link provided on this page. To exit the SQL Server Installation Wizard, click Close.

How to Change from Sql Server Windows mode to Mixed Mode(SQL SERVER 2008)

Server Properties - Security - [Server Authentication section] you check Sql Server and Windows authentication mode

Bind Themes in Dropdownlist in asp.net

This is .aspx code
 <table cellpadding="2" cellspacing="2" width="100%" align="center">
        <tr>
            <td valign="top">
                <span style="font-family: Verdana; font-size: 10pt; font-weight: bold;">Theme Name</span>
            </td>
            <td valign="top">
                <asp:DropDownList ID="DropDownList1" runat="server" AutoPostBack="true"
                    Width="100px" onselectedindexchanged="DropDownList1_SelectedIndexChanged">
                </asp:DropDownList>
            </td>
        </tr>
    </table>
This is .asox.cs code
public void Page_PreInit()
    {


        if (Session["Theme"] == null)
        {
            Page.Theme = "";
        }
        else
        {
            Page.Theme = (string)Session["Theme"];
        }
    }

    protected void Page_Load(object sender, EventArgs e)
    {
        if (!Page.IsPostBack)
        {
            DirectoryInfo themDir = new DirectoryInfo(Server.MapPath("App_Themes"));
            DropDownList1.DataTextField = "Name";
            DropDownList1.DataSource = themDir.GetDirectories();
            DropDownList1.DataBind();
            DropDownList1.Items.Insert(0, "Please Select");
        }

    }
    protected void DropDownList1_SelectedIndexChanged(object sender, EventArgs e)
    {
        Session["Theme"] = DropDownList1.SelectedValue;
        Server.Transfer(Request.FilePath);
    }

Reading and Parsing a CSS file in ASP.Net

This is my aspx code
<%@ Page Language="C#" AutoEventWireup="true" CodeFile="Default.aspx.cs" Inherits="_Default" %>
 
<!DOCTYPE html PUBLIC "-//W3C//DTD XHTML 1.0 Transitional//EN" "http://www.w3.org/TR/xhtml1/DTD/xhtml1-transitional.dtd">
<html xmlns="http://www.w3.org/1999/xhtml">
<head runat="server">
    <title>Reading a css file</title>
</head>
<body>
    <form id="form1" runat="server">
    <div>
        <table cellpadding="2" cellspacing="2" border="2" width="50%" align="center" style="padding: 20px;">
            <tr>
                <td>
                    <table cellpadding="2" cellspacing="2" width="100%" align="center">
                        <tr>
                            <td valign="top">
                                <span style="font-family: Verdana; font-size: 10pt; font-weight: bold;">Class Name</span>
                            </td>
                            <td valign="top">
                                <asp:DropDownList ID="DDLCssClass" runat="server" OnSelectedIndexChanged="DDLCssClass_SelectedIndexChanged"
                                    AutoPostBack="true" Width="100px">
                                </asp:DropDownList>
                            </td>
                            <td valign="top">
                                <span style="font-family: Verdana; font-size: 10pt; font-weight: bold;">Class Property</span>
                            </td>
                            <td valign="top">
                                <asp:ListBox ID="lstClassProperty" runat="server" Width="200px" Height="200px"></asp:ListBox>
                                &nbsp;
                            </td>
                        </tr>
                    </table>
                </td>
            </tr>
        </table>
    </div>
    </form>
</body>
</html> 
This is my aspx.cs code
using System;
using System.Collections.Generic;
using System.Linq;
using System.Web;
using System.Web.UI;
using System.Web.UI.WebControls;
using System.IO;
using System.Collections.Generic;
using System.Text;
using System.Text.RegularExpressions;
 
public partial class _Default : System.Web.UI.Page
{
    string aa = null;
    static string[] parts;
    private List<string> styleSheets;
    private SortedList<string, StyleClass> scc;
 
    public SortedList<string, StyleClass> Styles
    {
        get { return this.scc; }
        set { this.scc = value; }
    }
 
    protected void Page_Load(object sender, EventArgs e)
    {
        if (!Page.IsPostBack)
        {
            CssParser();
            GetStyleSheet(Server.MapPath("StyleSheet.css"));
        }
    }
 
    //To parse Css file.
    public void CssParser()
    {
        this.styleSheets = new List<string>();
        this.scc = new SortedList<string, StyleClass>();
    }
 
    //Get Style sheet to parse
    public void GetStyleSheet(string path)
    {
        this.styleSheets.Add(path);
        ParseStyleSheet(path);
    }
    public string GetStyleSheet(int index)
    {
        return this.styleSheets[index];
    }
 
    //Parsing style sheet
    private void ParseStyleSheet(string path)
    {
        string content = CleanUp(File.ReadAllText(path));
        parts = content.Split('}');
 
        for (int i = 0; i < parts.Length - 1; i++)
        {
            string[] parts1 = parts[i].Split('{');
            string str = parts1[0].ToString().Remove(0, 1);
            aa = aa + str + ",";
        }
        int len = aa.LastIndexOf(',');
        string ss = aa.Remove(len);
        string ss1 = aa.Remove(len - 1);
        string[] parts2 = ss.Split(',');
 
        //Binding all class of a css file to a drop down list
        DDLCssClass.DataSource = parts2;
        DDLCssClass.DataBind();
        lstClassProperty.Items.Clear();
 
        //Bind all property of a selected css class
        GetCssClassProperty(parts, DDLCssClass.SelectedValue);
    }
 
    private string CleanUp(string s)
    {
        string temp = s;
        string reg = "(/\\*(.|[\r\n])*?\\*/)|(//.*)";
        Regex r = new Regex(reg);
        temp = r.Replace(temp, "");
        temp = temp.Replace("\r", "").Replace("\n", "");
        return temp;
    }
 
  
    protected void DDLCssClass_SelectedIndexChanged(object sender, EventArgs e)
    {
        lstClassProperty.Items.Clear();
        GetCssClassProperty(parts, DDLCssClass.SelectedValue);
    }
 
    //To Bind all property of a css class
    private void GetCssClassProperty(string[] classArray, string className)
    {
        for (int i = 0; i < classArray.Length - 1; i++)
        {
            string[] parts1 = classArray[i].Split('{');
            if ("." + className == parts1[0].ToString())
            {
                string[] parts3 = parts1[1].Split(';');               
                for (int j = 0; j < parts3.Length - 1; j++)
                {
                    lstClassProperty.Items.Add(parts3[j].ToString());
                }
            }
        }
    }
}

This is my styleclass code
public class StyleClass
    {
        private string _name = string.Empty;
        public string Name
        {
            get { return _name; }
            set { _name = value; }
        }
        private SortedList<string, string> _attributes = new SortedList<string, string>();
        public SortedList<string, string> Attributes
        {
            get { return _attributes; }
            set { _attributes = value; }
        }
    }


Wednesday 30 January 2013

Install FTP for IIS 7.5 on Windows Server 2008 R2

Install FTP for IIS 7.5 on Windows Server 2008 R2

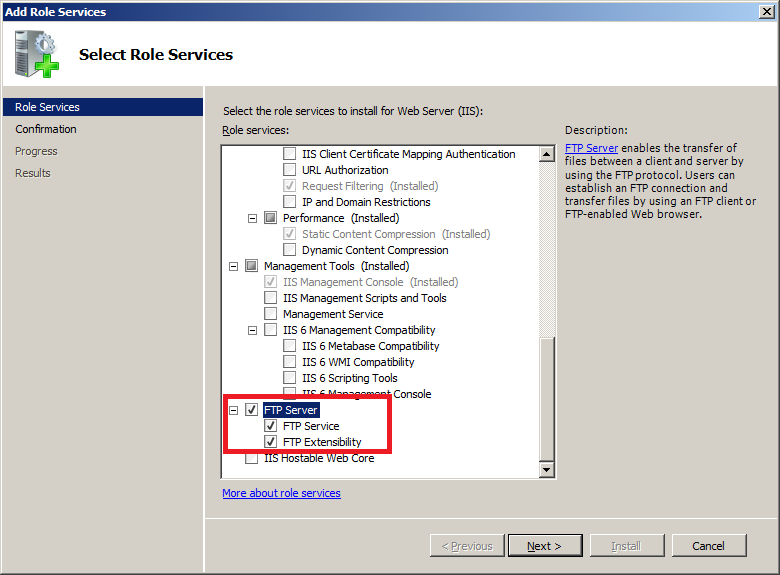
Click Start >> Administrative Tools >> Server Manager. In the Server Manager hierarchy pane expand Roles and then click on Web Server (IIS).
Install FTP for IIS 7.5 : Server Manager Click on Add Role Services which will launch Select Role Services window as shown below. Select FTP Service and FTP Extensibility services from the list. Click Next.
Install FTP for IIS 7.5 : Select Role Services On Confirm Installation Selections page click Install.
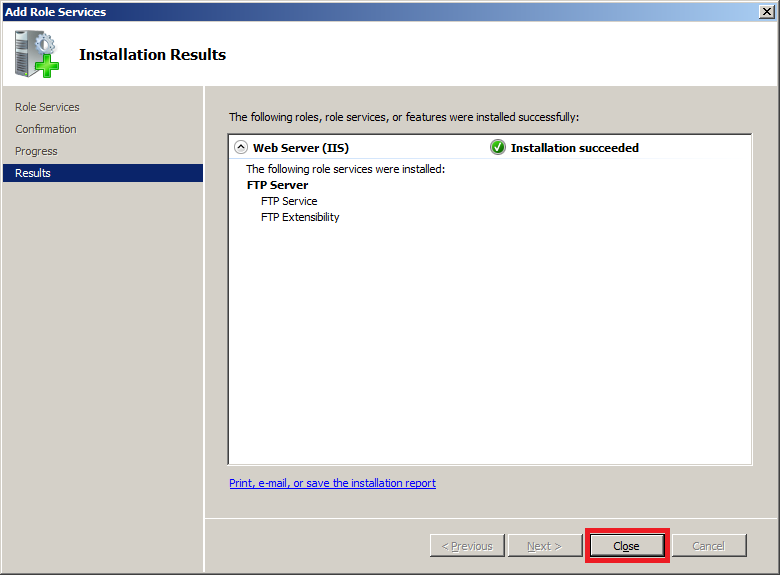
Install FTP for IIS 7.5 : Confirm Installation Selections On Installation Results page click Close to exit the Add Role Services wizard.
Install FTP for IIS 7.5 : Installation Results

Check Firewall Rules to Allow inbound FTP Traffic

After installation of FTP Server make sure that there are Inbound firewall rules in place to allow inbound FTP traffic. To check this follow below steps:
Click Start >> Administrative Tools >> Windows Firewall with Advanced Security and then click on Inbound Rules and check if three inbound firewall rules exists as highlighted in below snapshot.
  1. FTP Server (FTP Traffic-In): This rule allows inbound traffic on TCP port 21 for FTP Service.
  2. FTP Server Passive (FTP Passive Traffic-In): This rule allows inbound traffic on TCP ports greater than 1023 for FTP Service. This is required for FTP Service to work in passive mode.
  3. FTP Server Secure (FTP SSL Traffic-In): This rule allows inbound traffic on TCP port 990 for FTP Service over SSL.
If these rules doesn’t exists then create them.
Install FTP for IIS 7.5 : Firewall Rules

Create new Ftp site on iis

Using the FTP Site Wizard to Create an FTP site

In this first section we will create a new FTP site that can be opened for Read-only access by anonymous users and Read/Write access by the administrator account.
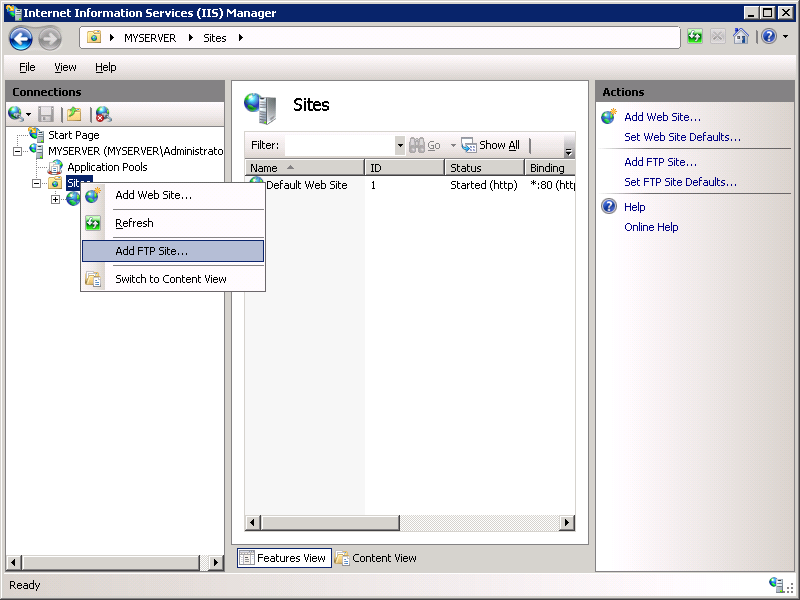
  1. In IIS Manager, in the Connections pane, click the Sites node in the tree.
  2. As shown in the image below, right-click the Sites node in the tree and click Add FTP Site, or click Add FTP Site in the Actions pane.
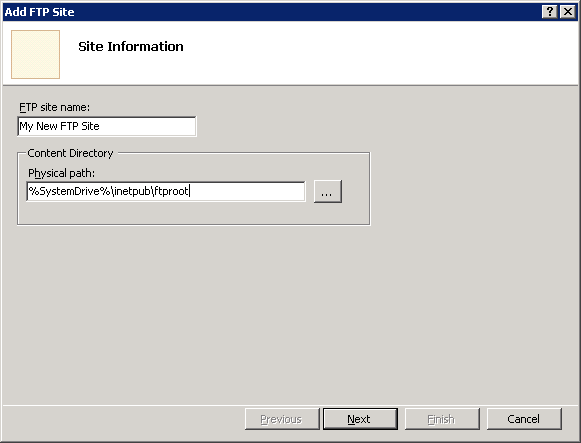
  3. When the Add FTP Site wizard appears:
    • Enter "My New FTP Site" in the FTP site name box, then navigate to the "%SystemDrive%\inetpub\ftproot" folder that you created in the Prerequisites section. Note that if you choose to type in the path to your content folder, you can use environment variables in your paths.
    • When you have completed these items, click Next.
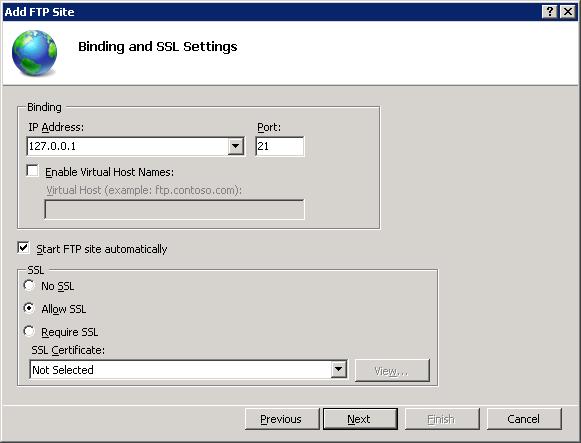
  4. On the next page of the wizard:
    • You would normally choose an IP address for your FTP site from the IP Address drop-down, or you could choose to accept the default selection of "All Unassigned." Because you will be using the administrator account later in this walk-through, you want to make sure that you restrict access to the server and enter the local loopback IP address for your computer by typing "127.0.0.1" in the IP Address box.
    • You would normally enter the TCP/IP port for the FTP site in the Port box. For this walk-through, you will choose to accept the default port of 21.
    • For this walk- through, you will not use a host name, so make sure that the Virtual Host box is blank.
    • Make sure that the Certificates drop-down is set to "Not Selected" and that the Allow SSL option is selected.
    • When you have completed these items, click Next.
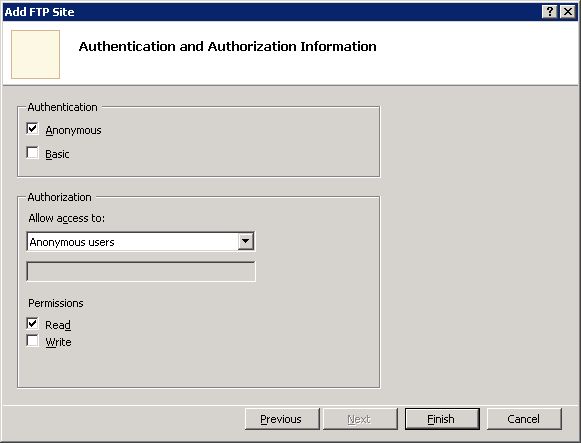
  5. On the next page of the wizard:
    • Select Anonymous for the Authentication settings.
    • For the Authorization settings, choose "Anonymous users" from the Allow access to drop-down, and select Read for the Permissions option.
    • When you have completed these items, click Finish.
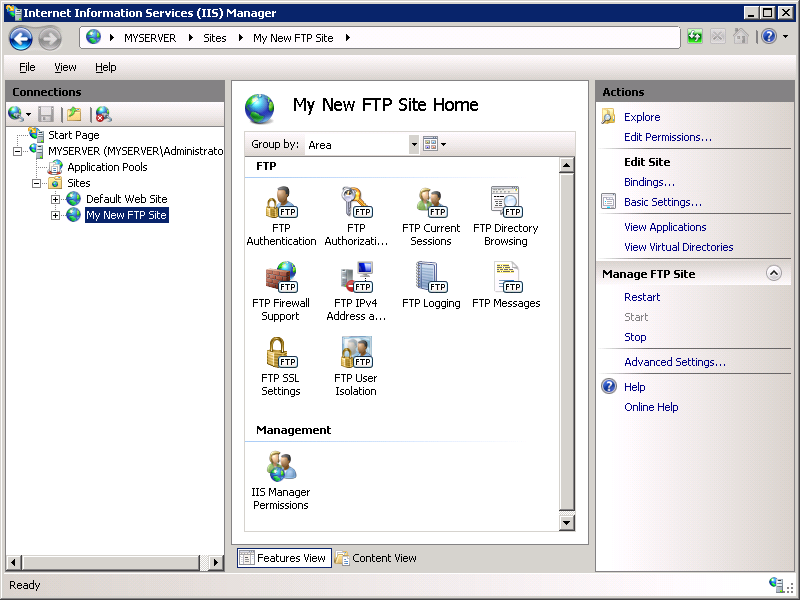
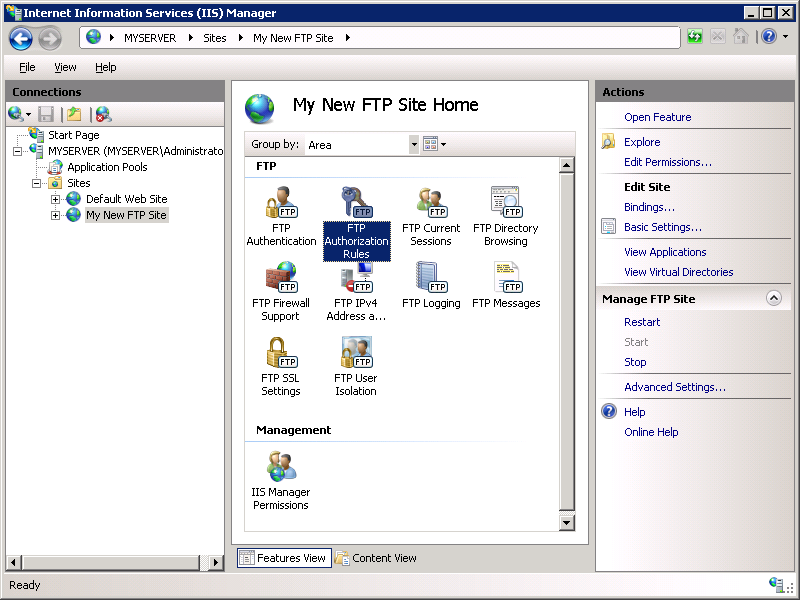
  6. In IIS Manager, click the node for the FTP site that you created; this will display the icons for all of the FTP features.
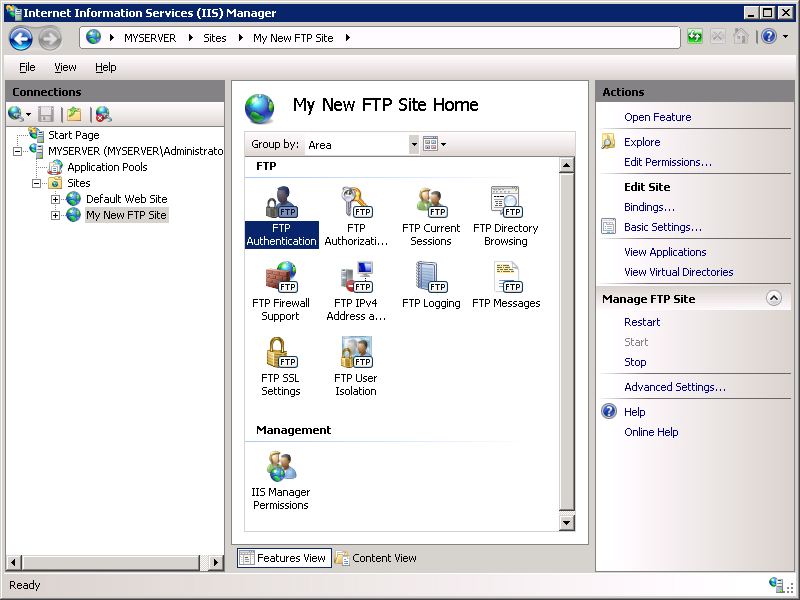
  7. We need to add Basic Authentication so that users can log in. To do so, double-click the FTP Authentication icon to open the FTP authentication feature page.
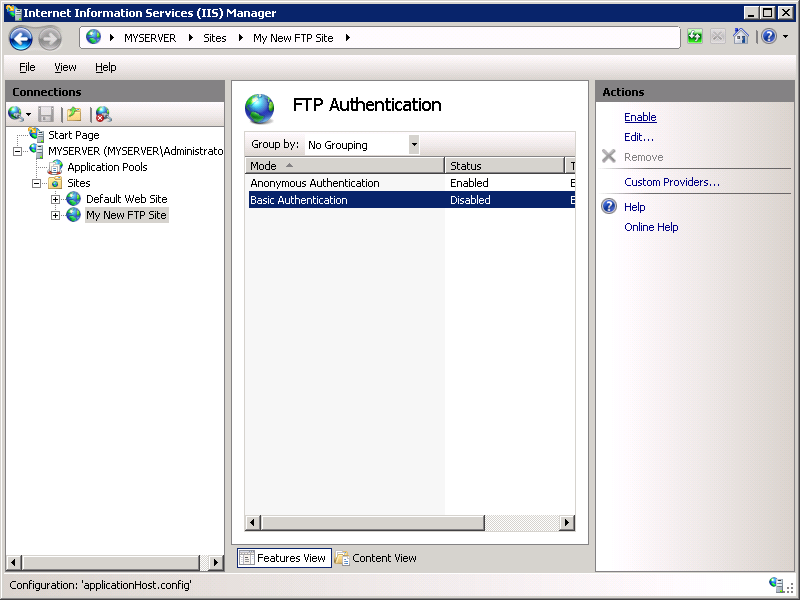
  8. When the FTP Authentication page is displayed, highlight Basic Authentication and then click Enable in the Actions pane.
  9. In IIS Manager, click the node for the FTP site to re-display the icons for all of the FTP features.
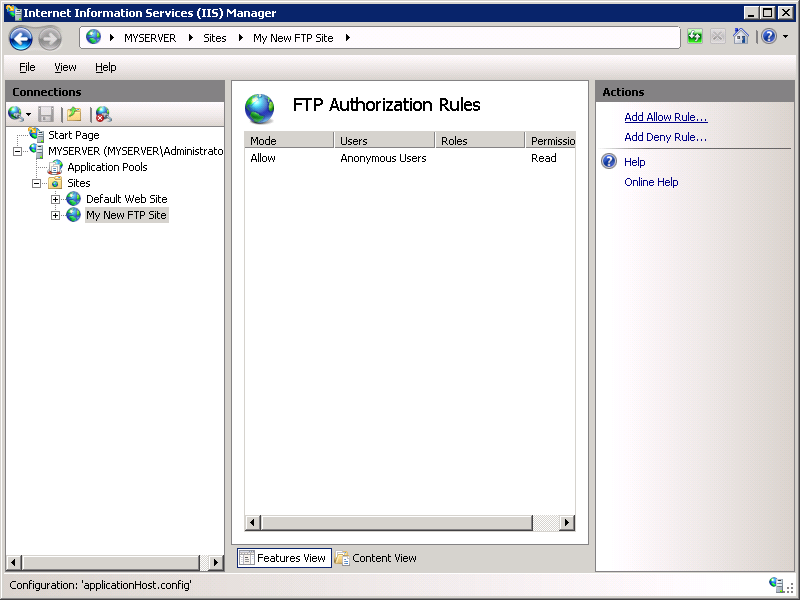
  10. We need to add an authorization rule so that the administrator can log in. To do so, double-click the FTP Authorization Rules icon to open the FTP authorization rules feature page.
  11. When the FTP Authorization Rules page is displayed, click Add Allow Rule in the Actions pane.
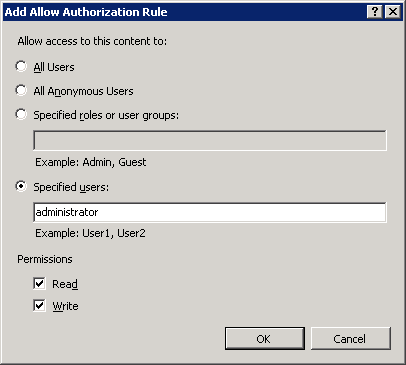
  12. When the Add Allow Authorization Rule dialog box is displayed
    • Select Specified users, then type "administrator" in the box.
    • For Permissions, select both Read and Write.
    • When you have completed these items, click OK.