Follow the below steps to take the Database Backup in SQL Server 2008 Management Studio R2.
1. Launch SQL Server Management Studio
2. Connect to the SQL Server Instance where the database exists.
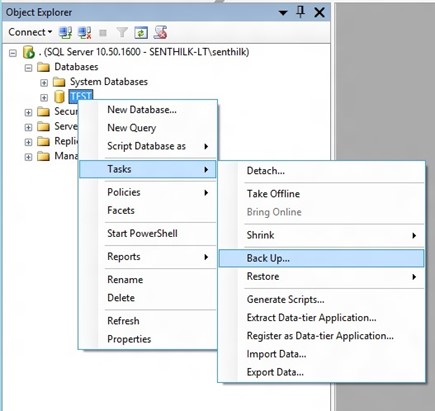
3. Expand the Database node and right click the database that you want to backup in the Microsoft SQL Server Database Engine in Object Explorer. This will open a Context Menu. Click Tasks -> Backup option.
 4. A Back up Database Dialog box will be opened. Verify the Database Name, Backup type (Full)
5. In the Backup component, select the radio button “Database”. In the Backup set, leave the default name and provide description (optional) and then leave the default value (0) days for backup set will expire after option.
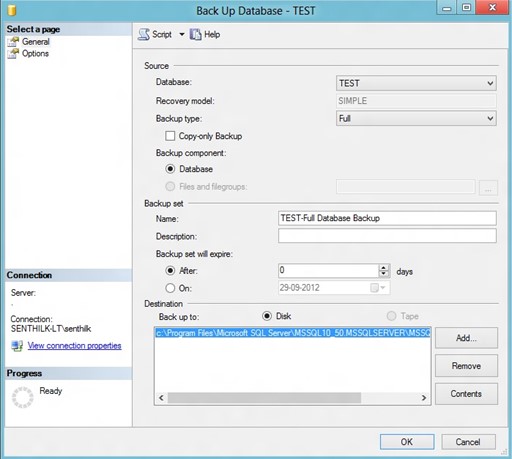 6. Alternatively, you can add the Destination to different path where
the SQL Server database back up should be saved to by clicking the
“Add” button.
6. Alternatively, you can add the Destination to different path where
the SQL Server database back up should be saved to by clicking the
“Add” button.
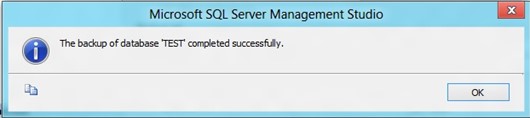
7. Click OK to start the backup process of the SQL Server database. Within some time, you should receive a confirmation message stating that the database was successful if all went fine… The backup file should now be available in the earlier selected path.
1. Launch SQL Server Management Studio
2. Connect to the SQL Server Instance where the database exists.
3. Expand the Database node and right click the database that you want to backup in the Microsoft SQL Server Database Engine in Object Explorer. This will open a Context Menu. Click Tasks -> Backup option.
5. In the Backup component, select the radio button “Database”. In the Backup set, leave the default name and provide description (optional) and then leave the default value (0) days for backup set will expire after option.
7. Click OK to start the backup process of the SQL Server database. Within some time, you should receive a confirmation message stating that the database was successful if all went fine… The backup file should now be available in the earlier selected path.
No comments:
Post a Comment